Start: Friday, August 31st, 2012
End: Wednesday, September 12th, 2012
You can find the rules here! You can find our handy tutorial on unconscious art here!
Okay, dinosaurs and fantasy creatures are fun - super fun - but we
can't let anyone get too comfortable, because we're jerks, so our next
battle theme is unconscious art! Did anyone else pick up the hint when
we did a sort of 'how-to' example post about it? It actually feels more
opportune to us if we do a difficult battle like this early on because
when the competitors are a core group of familiar people, we can really
hash any issues out regarding the theme. And if we can't explain the
concept well to each other, then we know that we shouldn't really try
guiding strangers through Unconscious art. Or something like that?
If anyone is interested in unconscious art they can
drop a comment or e-mail and we will be more than happy to brainstorm
with you!
I hope this post is to everyone's liking, I'm a little bit under the weather so we'll be sticking with the basic 'photo and description' type of post today:
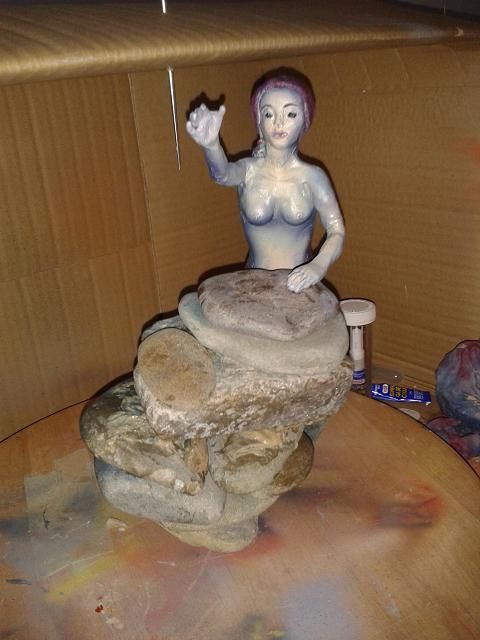
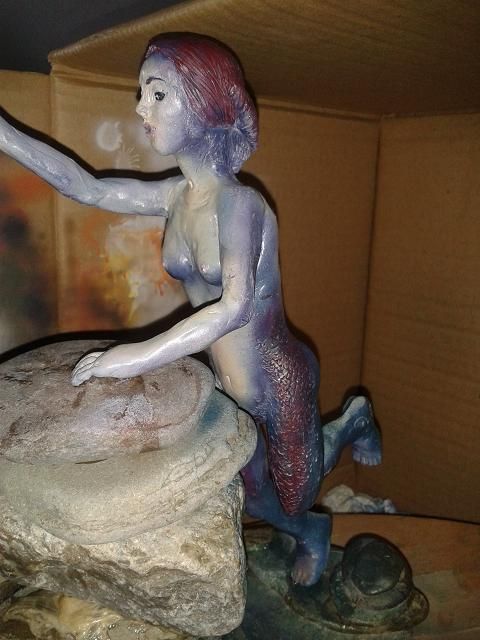
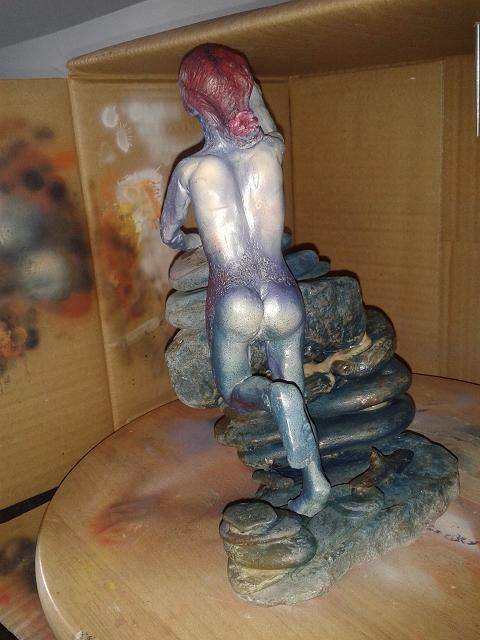
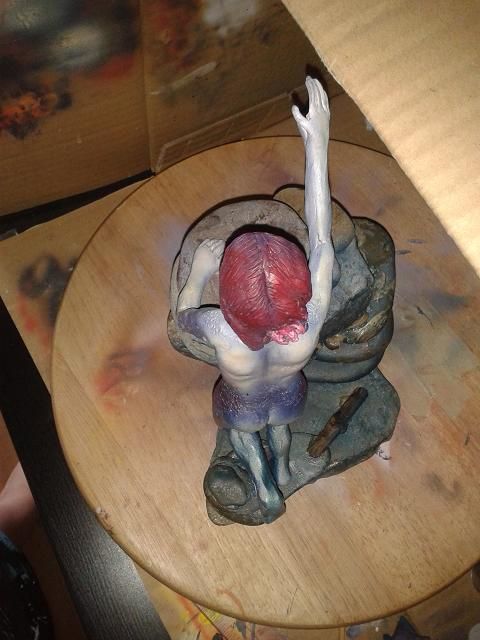
1) Jessie
Presenting Nixie! First off I should say I am not known for being able to do human figures or at least proportional human figures! I know there are parts of her that could be better but either way I am super proud :) A (Water) Nixie, for those who are not familiar, is a water spirit who can shape-shift, but generally appears in the human form. The rocks were random rocks I found at the beach and they are PL'd together. That glue is strong! I added in a few driftwood twigs I found while at the beach to the base. The Nixie is made out of a wire armature which is bulked out with tinfoil and masking tape. I used super sculpey clay and acrylic paints. She is airbrushed and I think she turned out fairly well. I forgot to time how long she took.
2) Nikki
This is my nameless dragon! (Edit: I've actually decided to call him Nameless the Dragon, because it sounds cool and reminds me of Toothless) I honestly don't remember how long he took me to make, just that it was a very, very long time. Considering that at this point in time my skills to smooth out the wax are still really undeveloped, I'm glad his texture turned out just how I wanted it to! At one point in time I accidentally snapped a wing in half >< Luckily it was a clean break and a bit of UV glue fixed it right up! I casted him in clear glass, then painted on black india ink. I used a wet paper towel to wipe the major surfaces off, leaving his texture a lot more pronounced than it otherwise would have been :). I don't think I have anything to complain about when it comes to this guy, even his wings fully melted and I had been so worried about them!
3) Panda (so cute!)
For the Mythical Creatures Week, I have sewn a unicorn. This little guy
is named Rad, aka Radically Rainbow. He is made of fleece and clouds and
rainbows and unicorn things, and wants to be your friend. Magical
wish-granting power not included.
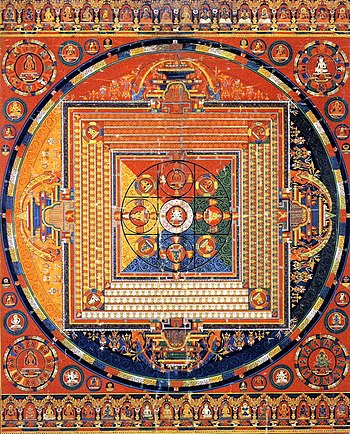
One thing I have learned early on in life is that many things are temporary. I think this is a valuable lesson for people who are artists, programmers, parents.. everyone. The fact that I have learned to cope with this idea has saved me lots of heartache and despair. My little sister used to 'enhance' my art with her own little scribbles in bright blue marker! It sucked but what was there to do? Or even with my programming work, I can be working on something for a good chunk of time only to have it thrown out in a second. When this happens I generally just shrug it off and consider it my own personal Mandala. The first time I came across Mandala's was during the Buddhism section of my World Religions class in grade 11. Basically we were taught that Mandala art was an intricate sand-painting that was a form of meditation for Buddhists, and that when they were finished with it... they would destroy it to represent no attachments to the human world. Humans have a tendency to 'claim' things. When we do something amazing we want to keep it forever to show it off to the rest of the world. So this concept of just tossing the art away was truly mind boggling to me at first. (Of course I don't know if what I was taught in school is 100% accurate but to me it was more the meaning of the lesson that was the important part.) Below is a picture of a Mandala.
Earlier today I was pondering about how other people might feel about just discarding their art and if there are artists who have made art with the intent to discard it afterwards. I immediately remembered the art of the imperfect guy! Nikki showed me a TedTalk video awhile ago of Phil Hansen, who wanted to be an artist but couldn't draw a straight line. He was diagnosed with permanent nerve damage.
He loved art so much that he learned to embrace his imperfect-ness. He began to think about what if he had other limitations and how they would effect the way he does art and what he might do to overcome it. This thinking led him to do much experimentation. Phil Hanson came into my thoughts because he did a project that lasted around a year called "Goodbye Art", where he had to destroy his art after its creation. For instance he paper-shred it, burnt it, created art on bananas that would rot, etc. He made art that did not have to be "tangible, serious or permanent".
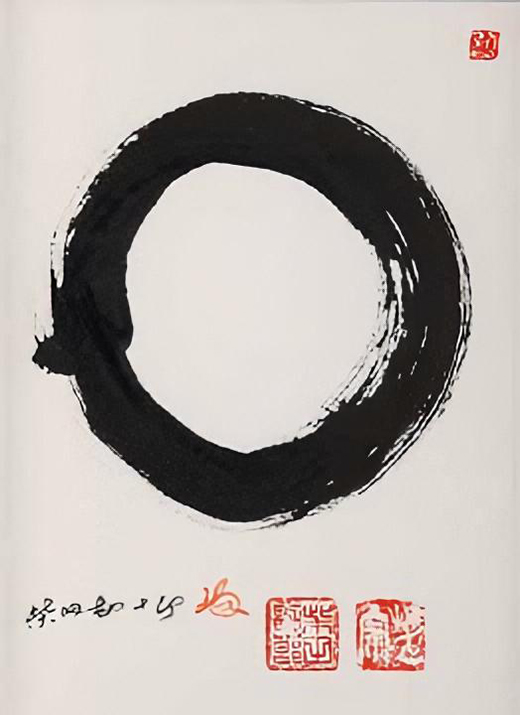
This train of thought about welcoming imperfection led my mind to drift again. This time it started to think about Ensō, which means circle in Japanese. When working with Ensō one must simply stop thinking which allows your body and spirit just create.
"For the former, the opening may express various ideas, for example that the ensō is not separate, but is part of something greater, or that imperfection is an essential and inherent aspect of existence" (More Info)
I find it interesting that when I think of art it always has to be 'permanent'
in my mind, but some of the most beautiful art (the natural world around
us) is all about change and the cycle of life and death. Impermanence and imperfection are negative words in today's society but clearly they don't have to be. Its all about perception and opening yourself up to the idea of art that doesn't have to be 'perfect' or 'permanent'.
Art is a great way to just let go and it is a healthy exercise to just empty your mind and not worry about the final product. Embrace the intangible and hold yourself to no standard of perfection.
Unconscious art is a little bit hard to explain, especially in writing, but it's a pretty cool idea and I absolutely adore it!
At a glance, as the name suggests, the idea is to make art without thinking about it. "Well," you're probably thinking right now, "That's downright impossible unless it comes to me in a dream!" But trust me, it is possible, and to keep it simple I'm just going to offer some quick points for you to link together and digest on your own.
-> When making unconscious art you cannot have a 'final' idea on what your piece is going to look like.
-> It's okay to choose one shape or tool movement and just repetitively go with it - who knows how it will turn out!
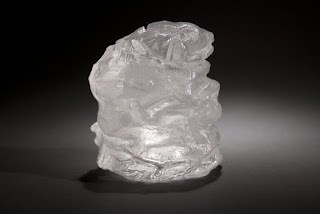
I created the above piece by throwing around
clay, then shoving a serrated tool into every crease I saw, and simply
wiggling the tool around to turn the area into a little crevice. At
first glance I thought it was hideous but now I love it because I don't see anything else like it.
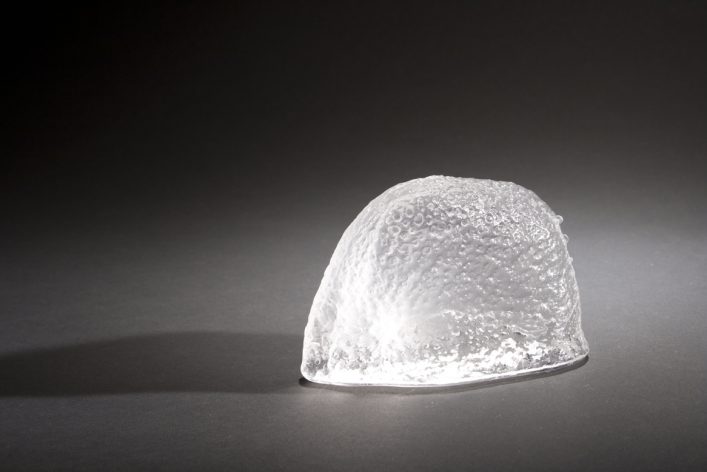
On the piece below, after throwing around the clay (until I was content to
move on), I took the end of a tool and just poked as many holes as I possibly could. When I made these two pieces I was just trying to pass
some time after a rough life problem; the inability to focus on
my art meant I could just go with a new flow, and develop a unique form.
-> Puking your colors onto your canvas actually counts as unconscious art.
->
Why is puking a horribly great example? Because short of aiming your
head in one direction or another, you have no control over the way the
final piece will look.
-> For the artist who cares about their
teeth, this is how my school mate Chris says he did the following pieces:
To create these images Chris tried his hardest not to look at or think about what he was doing as he randomly did auto-writing in wax, followed by water, black ink and
red ink. He went on to explain, "I did this on a bed of newspaper and paper towel and
once I got all the ink on, I picked it up and let the excess drain
off first toward the bottom, then toward the top and then left
side, and right side if it was still moving.
Total work time
like 45 seconds, and then quite sometime to dry. It's not
terrifically important, but it is part of the rules I set-up for
myself! I suggest fixer after it's dry so you don't get that
serendipitous smearing during mounting." *If anyone's interested in his amazing Rorschachs, he's got an Etsy.
->
You cannot create this type of art using a process such as glass
blowing, because there are too many variables that you have to take care
of (i.e. the heat, pipe rotation, glass thickness).
That last point is kind of a doozy right? If you're a textile artist, then you can't very well sew an 'unconscious' wallet, can you? But I think that's where it becomes really fun, because you have to look outside the box!
Textiles:
My suggestions to Ducky have been along the lines of, "Throw some pieces of fabric around without looking, then sew them together as they are." Yes this does sound like a big mess, because what could you make it into? A malformed doll or ball?
Her idea was to use an unconscious process (inspired by Chris') to create print and dye patterns on her fabric. From there, she can take that unique fabric and make whatever she'd like with it!
Super Sculpey:
Jessie's solution to the dilemma of building an armature (which you can't do unconsciously) is to doodle onto a piece of paper, and then take that drawing and translate it into 3D. As a bonus she still isn't going to have a clue what the final piece will look like since she needs to create the other sides of it, so there's two elements of surprise in her work!
All in all, unconscious art can be a little bit complicated, it's hard to tell when you're thinking without meaning to, and some people just can't grasp this concept at all. But it's definitely worth it, even if you're just taking an unconscious design and then using it to build something new up - because I guarantee it will stand out from your other work.
Finally, if you have any neat ideas for other unconscious processes, go ahead and let us know! I'm absolutely enthralled with the idea of running at a medium from a new and mysterious starting point!
And remember, you can comment without signing in!
[Edit: I tweaked Chris' quote after he commented and suggested we elaborate on the random/unconscious nature of his process.]
The results for the first craft battle are as follows:
Jessie (Velociraptor)
11
(26%)
Nikki (Triceratops)
16
(38%)
Ducky (Spike from MLP)
14
(33%)
Panda (Dino plushie)
1
(2%)
And the winner is, Nikki's Triceratops! Not sure how that happened.
In the case that either Jessie or Nikki should win a battle, we'll be giving you a random post instead of an interview, because you already know about us. Now, Jessie's random post:
First off, I want to give a big Hurrah! For Nikki and I have reached 1k views in less than one month! :D Thats very exciting for us and we had a mini celebration squee to celebrate. Now all we need to work on is more comments! Hint hint :P (You don't have to have an account to comment - Nikki)
Alright getting back down to business, a few days ago I eavesdropped overheard some lady talking about her art while on the bus. She was telling her friends how she was recently talking to someone and was going to get featured in their magazine. By this point, I was fairly interested and imagined what sort of art she dabbled in. Finally she mentioned what her craft was... Miniature Art. This answer shocked me and I immediately realized that my knowledge could be measured as little to none. When thinking of miniature art I first think of those miniature food items (such as tiny waffles or bento boxes) that I often see on craft sites. I decided to google miniature sculptures and was delighted by what I found. Below are three artists that stood out to me the most. :)
Christopher Boffoli
Christopher is a photographer, writer, artist and filmmaker who is based in Seattle. The following pieces are from his Big Appetites series of fine art photographs. His motivation is definitely something I can relate to, since it is the reason why I love miniature things. Basically he was fascinated by tiny objects with great detail and as a child he collected model rail roads and built model vehicles.
It was so like Patty. Right idea. Wrong execution.
422 days without an accident at the chocolate quarry.
Dalton M. Ghetti
Mr. Ghetti was born and raised in Brazil, but has lived in the U.S. since 1985. He is a self-taught artist who is a carpenter and home modeler by trade. He finds sharpening pencils to be therapeutic and enjoys doing so as his hobby. Visit his site for some more info :)
Hand Saw
Chain
Willard Wigan
I love this guys story. I am just going to quote directly from his website.
“It began when I was five years old,” says Willard. “I
started making houses for ants because I thought they needed somewhere
to live. Then I made them shoes and hats. It was a fantasy world I
escaped to. That’s how my career as a micro-sculptor began.”
He said it perfectly, miniature sculptures really do give me a feeling of fantasy and childish whimsy. I love them. You can listen to Willard's TEDTalk where he goes over how through his hard life he was able to find his love of 'micro-sculpting'. (I love Will's story - Nikki)
Star Wars
Nine Camels
So although I guess I shouldn't eavesdrop, but at least something really cool came out of it. I hope you enjoyed our walk through the world of miniatures. :)
Note: I am not sure if there is a direct difference between 'micro-sculptures' and miniature sculptures, so sorry if there is.
Silicone molds are extremely useful, especially if you want to mass produce something, or be lazy. I use it to create wax positivies, which are then made into glass, but I've seen other people use it for resin, soap and sugar decals for cakes. On my blog Glassables there is a silicone demo post that has more photos and is run a little smoother since I wasn't participating, but I wanted to make one based off my own trial and error adventures with my friends. After all, I think there's a skill in being able to work messily and quickly, while taking photos at the same time.
Materials Needed:
-dish/hand soap
-silicone type 1 (stinky gross stuff!)
-a bucket of water
-a permanent marker
-a plastic surface to work on
-a bit of clay or wax
-ventilation (the overwhelming vinegar odour is not appealing)
-the object you'd like a master mold of*
*Brass will be ruined
I wanted to make a mold of an ostrich egg, so I could use it as a blank for making large dragon eggs. My friend Tabbie pumped the silicone for us, while our other friend Mandi kneaded the silicone together and then passed it off to me so I could wrestle with it on my egg. It took two tubes of silicone to cover this beast.
Step 1: Use the wax/clay to attach your object to your plastic.
Step 2: 1" away from your piece, draw a line with a permanent marker.
Step 3: Soap up your object, your water, your hands and ALL up your arms (or the silicone will stick to you!).
Step 4: Grab your Type 1 Silicone, and poke a hole through the seal inside (we forgot and it broke out the back).
Step 5: Squirt silicone into water - make sure the silicone hits the water BEFORE it hits your hands.
Step 6: Knead it together into a ball, then quickly pass it on/apply it to the object.
Step 7: Apply to object.
It will try to slip down the object, so keep pushing it upwards and fighting with it!
Try to make it 1" thick all around, if it's too thick it will be less flexible and harder to work with ):
At this point I couldn't keep picking up the camera, sorry!
Step 8: When you give up wrestling, press a sheet of glass onto the top of the mold
to make a flat spot that it can sit on. Let your silicone set!
Step 9: Take out/Cut your object free within 24 hours. Cut zig-zag lines, not straight ones.
Use T Pins to keep the cuts together when you're casting into it.
Notice the lack of natural opening on that mold? I didn't use enough wax (never be afraid to have too big of a hole), so either my rough handling or the weight of the silicone caused the egg to tip off center. That or the wax just didn't stick to my plastic well. I think having the mold come loose has affected the way the mold will look, but we won't know until I get some T Pins so I can use it.
You
can see the tiny tangerine mold above, and I think it's worth
mentioning! You see, we accidentally opened a third tube of silicone so
we HAD to do something with it.
So I went, "Quick! Someone check to see if there's a tangerine
upstairs!"
Then I had Mandi fly solo on soaping/attaching/molding the tangerine. Her wax, of course, also came undone, so she was flying blind with and everything was going wrong that could. And you know what? That made the experience much more worth it. There's nothing better than having no idea what you're doing (especially when the outcome doesn't matter).
Miss Mandi told me earlier in the day that she was curious about resin and polymer clay because she had a) started making jewelery and b) wanted to get more into art. Assuming that one day she'll have a reason to make a mold, I think having this terrifying experience under her belt will come in handy.
Alright, we're already on to our second craft battle and gosh I am just so excited! The details are as follows;
Battle Theme: Fantasy Creatures
Start: Friday August 17th, 2012
End: Wednesday, August 29th, 2012
As always if you would like to show off your fine work on this blog after the craft battle is finished, please remember to check out and follow our simple rules.
I'll let you know right now that my inspiration started off as simple as 'dragon' but my concept for style led me to reminisce about Mulan. And you know what? Having a solid reference seems to be extremely helpful, instead of pushing myself to fabricate my own style out of thin air, I'm planning on starting with a Mulan stylized creature, then the more sketches and/or pieces I make, the more I can tweak the style into my own. It makes life a whole lot easier!
Anyway, rambling aside, I hope you ponder some fun fantasy creatures today, maybe do some research into the less known ones?
You probably can't guess yet but I am extremely excited for this post! But first, an important note regarding submissions:
Now, for the time being we've realized that having the battle End on the 13th day, means people really only get 12 days to work on a battle, and that last day might be important to some busy people. So, until we figure out a better arrangement, artists are free to submit their pieces to us at any time on the 13th/End Battle day, and we will edit them into the post. However, if you are ready to go before the 13th, please e-mail us your photos and blurb ASAP! It's appreciated :)
I am wagering that Jessie's amazing Veolciraptor kicks my dinosaur's butt clear out of the water.
I'm so proud of her! Her level of detail is so high that she always has an open offer from me to sculpt something in clay or wax, and then have me cast it for her. Of course, she's too lame to take me up on it ):
1) Jessie
Presenting....
Velcro the Trolling Velociraptor! He is constructed from a mixture of
Super Sculpey and Sculpey Original (terra cotta) clay. His armature is
made up of masking tape, tin foil and floral wire. And he was painted
with an airbrush. He has around 24 hours of pure work into him.
Velcro
was a character that my friend and I made, we graduate in December so I
decided to make something special for her.The story behind Velcro is
that he really isn't a Velociraptor, rather he is a Deinonychus.
However, thanks to Jurassic Park people think this is what velociraptors
looked like. So my friend and I made this character who pretended to be
a Velociraptor (hence the trolling). I also sculpted him a small
feather (since real Velociraptors have feathers), it is the little blue
thing he is holding.
I loooove how he turned out :) 2) Nikki
As a kiln caster, I think it's important for me to focus on detail. When I think up a piece I have to reason why I want to cast it, versus flame working or hot sculpting it - and nine times out of ten the reason falls to the level of detail I can use. Then Jess came out and strutted her stuff with Velcro and I went, "Damn, I'm going to really have to step up my detail and start enameling some damn color in there!" I've made a few dinosaur waxes since laying eyes on Velcro, and let me tell you, I think they are already visually improved.
His horns are electroplated and he's been sandblasted to help bring out the detail in the clear glass. He probably took me three hours to make. Then again, I did have a lot of trouble finding a way to have the copper tie only to his horns. When I made a Stegosaurus the copper crawled down all the way to his leg! So I knew I had to be more careful.
3) Ducky (Check out her Blog) Spike may be a dragon and not a dinosaur, but I happen to be 100% convinced that dragons were pterodactyls, so it's okay.
This is my Spike iPhone case! I bought this cross
stitch case earlier this year and it seemed like it was time to switch
out the art in it. The character I chose is Spike from My Little Pony
because isn't he just so darn cute? It took me about an hour or so and I
simply used embroidery floss and a blunt cross stitching needle. The
only thing I would change about this is the color of the case because
some of the colors don't stand out very well on the black background.
Thanks for looking :)
4) Panda Adorable! :)
My name's Panda, and this is my submission for Dino week! This little guy is named Compsognathus, or Soggy, for short.This is part of my Craft Battles Series of my Next of Kin plush dolls.
I have never had a clue how those mass produced, collectible plastic figurines came into being, I just didn't think about it past the fact that I knew the plastic was pressed in some neat machinery. It turns out a master team of bad ass artists shares the tasks and spends a couple months perfecting that little figurine. I should warn you ahead of time that I have no idea what the putty they're using to sculpt is, etc. If someone knows I'll edit the information in! Also, there are a TON of pictures for this competition, so I really, really suggest you check out the original links at the bottom of this post.
Pictured above: The bad ass looking team. Second guy's expression is so enthusiastic, it's adorable!
The link I came across however, shows a competition where nine artists
divvy up the tasks, work together and compete against an eleven hour
clock! Why is this interesting to anyone else? Well I don't know, I
might be the only person to find this interesting. I think it's a form of production art that aspiring sculptors can aim for though. Also, some
things about the process stuck out.
Reference Image
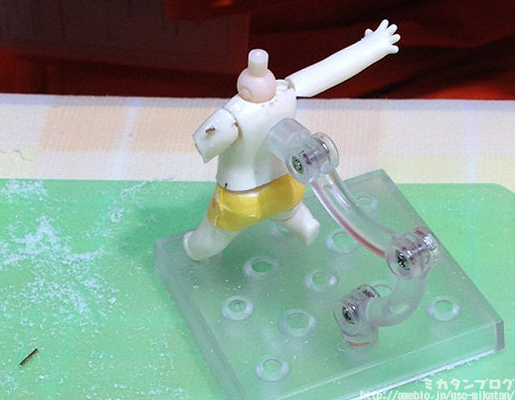
'Rough' prototype!
To make their lives universally easier, there's a plastic base for each body part. Not only will they be able to work faster, but all their sculptures will be proportionate to each other! I'm sure that some sort of base must be available for use in individual sculptures made of polymer clay right? The only materials I can think of are plastic, resin or wood though, none of which I'm assuming should go into the oven. Quick, someone go and invent bake-able bases, you'll be rich! For myself, I suppose if I wanted a series of proportionate people I would make a master silicone mold and pour myself wax bases to build up on.
So creepy but so useful.
I'm guessing they slice limbs in half, arrange their respective poses and then stick them back together with wire?
They also assembled this project piece by piece, and yes I know if there's nine people working than piece work is necessary, but I'm talking about the fact that after the hair was finished - they removed it so they could work on the head. True, I'm not sure how to accomplish this when the material is wax on wax (or polymer, etc), but maybe a piece of plastic wrap would help you sculpt the shape without committing to the union of two pieces. By the way, you have absolutely no idea how hard it was to get these two images to line up beside each other! -Shakes a very angry fist at Google.-
Mid-stage hair - seriously check the website photos!
Ack she's been scalped!
I think it's great to get a sneak peek into how mass produced sculptures are made, maybe one day you want that to be your niche, wouldn't it be cool? Screw glass, clay and resin, you want your art casted in plastic and purchased by thousands of enthusiastic collectors, to be forever fawned (and possibly fapped) over because it's so gorgeous! If you do ever want to take on the task of serious production, remember that this girl's headphones and guitar are normally created using 3D technology, so it's safe to take a breather when it comes to small details! For this contest they clearly had to sculpt these things though;
I wish I could create such smooth objects, this putty is so magical.
I only noticed this picture while writing the blog post, that's such a smart way to hold your items!
The last thing I want to point out is the fact that nine people (even though there are only four pictured above) work on this one, teeny tiny sculpture together! I imagine that each person is skilled in a well-rounded type of way, but they each are assigned certain areas to work on, and they have to trust that the others will do their job properly. It's just like outsourcing, but to friends! A teacher of mine has mentioned that outsourcing can be really useful, but for some reason people seem to frown upon it. He even suggested that since I'm terrible at glassblowing I could never enter the hot shop again and just ask someone else to blow a vase for me whenever I needed something to engrave - and yes, that comment did really hurt, but oddly enough it didn't deter my stubborn nature. I'm not really into glassblowing, but I've actually thought of some things I want to make this year, and I sure as hell am not going to pay someone else to make them for me! With proper motivation to push me, the experience of blowing something I'm really interested in is just too good to pass up! (Hint, hint: CLING to your motivation when you find it guys, it's like a power-up to your skill level.) Uuh I got a little off topic though, sorry, the point of this paragraph was that as long as you are not as stupidly stubborn as me, it's okay to outsource to friends who are better equipped for the job.
Look at that team work! It's radiant!
Her mismatching nature is actually really attractive to me, I think it emphasizes the amount of work that's gone into this.
To sum up my rambling the wonders of this competition I found are;
1) Figure blanks/bases!
2) Mass production at a level where you can have a huge base of collectors!
3) Outsourcing and team work!


